Sunday 20 September 2009

Developer Key


What is a Developer Key?


It's simply a file that allows you to run unsigned operating system images. OLPC produces many unsigned operating system images for development and testing, which will only work in your laptop if you have a developer key.

If you don't have a developer key, and your laptop has firmware security enabled, it will not let you do anything except boot an OLPC-signed operating system, and use the OLPC-provided software. If you insert a USB flash drive or SD card, the boot firmware will only boot from it if the files are tested and cryptographically signed by OLPC.

Also with the developer key the firmware will make XO act as a normal PC, how so?
  1. It will allow you to interrupt the boot process to enter commands, by pressing the Esc key (x) located on the upper left corner of the key pad.
  2. It will let you run any program or boot into any OS such as Sugar on a Stick, no matter whether the OLPC organization has tested, approved, or signed it.
Once you have your developer key you should make a back up copy of it, save it on your PC for example, just in case you accidentally delete it. But I don't think you need to worry about this much because you can always re-download it with out having to go through the registration process again. Another option is to disable firmware security permanently, this way you will no longer need your developer key, but I read that sometimes you can run into problems while trying to disable security so the sound choice might be to have an extra copy or just re-download .

I did read that instead of getting a developer key you can press on the 4 game keys when booting into your XO.


Getting your Developer Key

First you will need to be connected to the internet via wireless. To learn how to connect to a wireless network see the post Connecting to a Wireless Network.

1. Open the browse activity and type in file:///home/.devkey.html, or on the home page click get a developer key.


2. You will be redirected to the Developer Key Request page. There click the button Submit Query. Then you'll be redirected to a page informing you when your key will be ready.
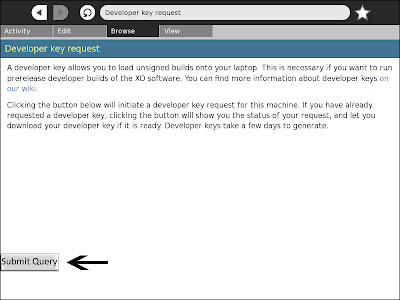


3. When you return to the page in step 1 after the specified time you should get a window like the one below informing you that your developer key is ready. Follow the instructions to download your developer key.


4. Once your key is downloaded copy it to your USB. Open the terminal activity, then type su --> press Enter --> cp /security/develop.sig /media/USBName. This will copy the develop.sig file to your USB. Now create a new folder, name it security, then cut paste develop.sig into this folder.


That's it!!

For more information on this topic visit this webpage.
Creating a Back up for your XO


Why create a backup for your XO?

For the same reason you would backup your PC to be safe, it's a good idea to take precautions and create a backup when your making major changes to your laptop that might cause it to malfunction, such as, major updates (like updating to a newer version/release of Sugar); these operations are supposed to run smoothly but there is a chance they might fail. Having a backup allows you to restore your XO to a previous in which it was functioning properly.


What you need to get started

  1. A USB with at least 1GB free space.
  2. A developer key. Actually I read that you don't need the developer key, instead you can hold the four game keys when booting into your XO.

Check your USB
  1. Make sure you have at least 1GB free space.
  2. Make sure its a FAT, FAT32, or VFAT format.
  3. Make sure you don't have a bootable OS on it, such as Sugar on a Stick. If you do it will boot into that OS instead of the Open Firmware (OFW).
  4. Make sure you have copied your developer key (develop.sig) into a folder named security.
Steps 1 & 2 can be checked from your USB's properties. Right click on USB --> Properties.


Time to Back Up!


1. Plug your USB into one of the XO ports.


2. Start or Restart your XO while holding down the Esc key (x), or just wait until the white screen appears with the XO logo then press the Esc key. This will get you into the Open Firmware ok prompt.


3. Type in the command probe-usb, your USB should show as USB2. USB1 is too slow.


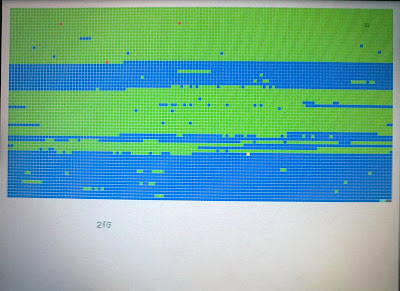
4. If by some chance you forgot to free up enough space for back up not to worry. First type scan-nand if it's completely green (full) you will need 1GB free space, if it's half green half blue (half full) you will only need 500MB free space. Now type disk-free u: to see if you have enough space, if you don't delete some files using the command rm u:\fileName.extension, for speed you can use wild cards to delete all files with a certain extension as in rm u:\*.png.


5. Type the command save-nand u:\backup.img. The name backup isn't obligatory, you can name it whatever you please, but it's always a good idea to have a meaningful name. Just make sure you don't forget the .img extension.


6. Now all you have to do is wait while the back up is being created. You can see a little box moving from one green box to the next, also below you will see a counter that counts from 0 - 1FFF.


7. When the counter reaches 1FFF the OFW will report Done, and give you the name of the CRC file, which in this case would be backup.crc. I'm guessing it will name it according to the name you provided in step 5. You can verify that both the backup.img & backup.crc are now on your USB by typing in the command dir u:.


8. Now you can remove your USB. Copy the 2 backup files to your PC if you like.


9. To exit the OFW you can type either boot to start the OS (boot into the Sugar OS) or bye to restart the machine.


Restoring your XO


1. Plug your USB into one of the XO ports

2. Start or Restart your XO while pressing the Esc key.

3. When your in the OFW ok prompt, type in the command probe-usb to make sure it's displayed as USB2.

4. Next type in the command dir u: to make sure you have both the .img & .crc backup files.

5. Type in copy-nand u:\backup.img. Of course backup is the name you used for your backup files.

6. Wait till its done. Then restart your XO.

Saturday 19 September 2009

Connecting to a Wireless Network

These are a few simple steps you can follow to connect to a wireless internet.


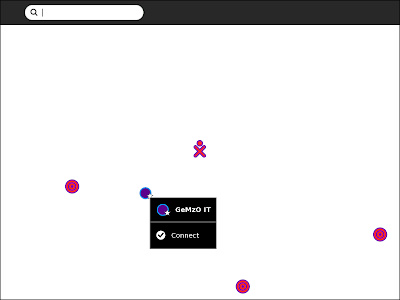
1. Go to your Neighborhood view. It's the icon on the far left. You should get a view similar to the one below. Hover over the Network you wish to connect to and click in the middle of the icon, or wait for the menu to appear and click Connect.


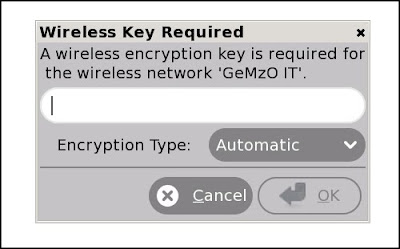
2. If you are trying to connect to a secured wireless connection you will be prompted for a password. Enter the password and press OK.


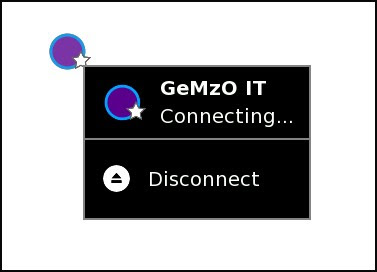
3. Next it should say it's Connecting.


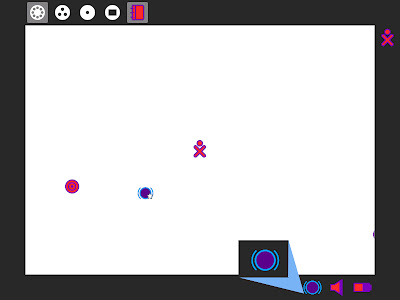
4. Once your connected you will see an icon like the enlarged icon in the image below.


Here's a list of icons you might see and what each means:

Thursday 13 August 2009

Get your Sugar on a Stick!!


Getting started

We need a few things:
  1. A USB with a minimum capacity of 1GB.
  2. Strawberry iso image, this is actually optional the program we will be using can download it for you in the installation process but it's 379MB, so for a slow connection I suggest you download it as a torrent from here.
  3. The LiveUSB-Creator. Note that this software works both on Windows and Linux.

Let the installation Begin!

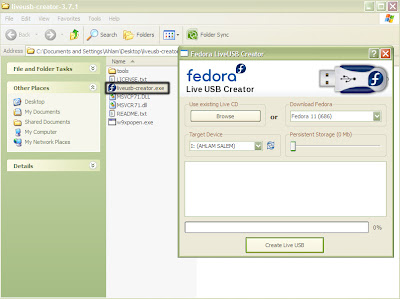
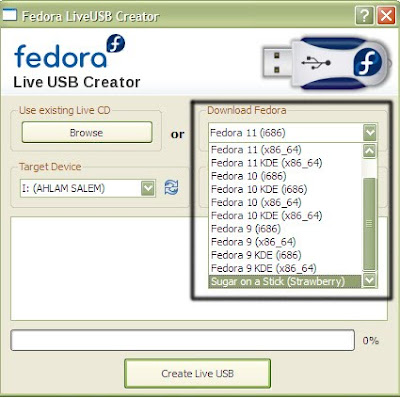
The first thing you need to do is extract the contents of the LiveUSB-Creator. Once that's done plug in the USB device you plan to install the image on. Now double click on liveusb-creator.exe, this window should pop up.


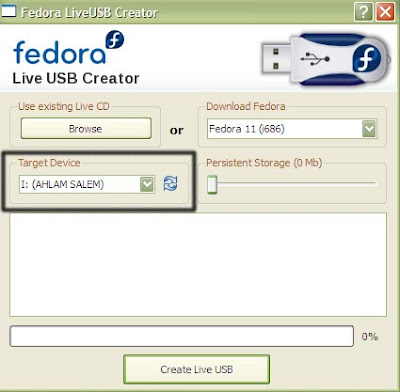
Now make sure the Target Device is set to the USB your aiming to install Sugar on.


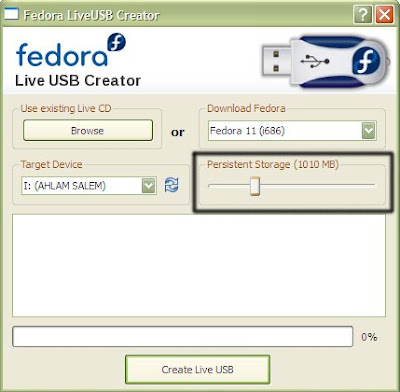
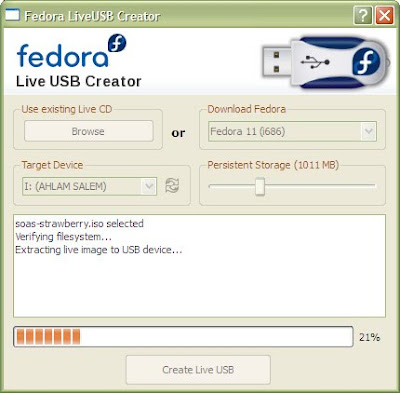
Next move the slider to set how much space you would like to grant for the storage of Sugar, remember the minimum space required is 1GB. As you can see from the picture below I used the minimum space required.


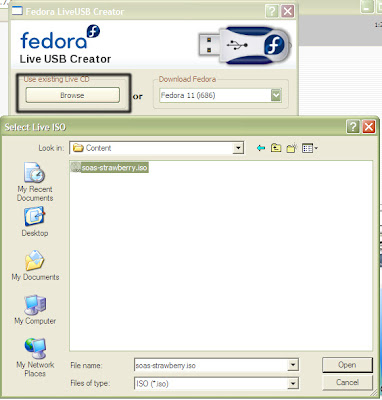
If you already have the strawberry image, all you need to do is click browse and select the iso image.


If you don't have the iso image, simply select Sugar from the drop down list on the upper right corner.


We're almost there!! Now click the Create Live USB button. If you already have the strawberry image this should only take a few minutes, if you don't it will take quite a while due to the fact it needs to download the image before it can begin the installation.


After the installation is complete you can close the program and try out your Sugar on a Stick. Safely remove your USB but leave it in the port. If your using a desktop it might be better to plug the USB into one of the rear ports for easy detection.

Now you can restart and it should automatically boot in from your USB. If it doesn't then you should check your BIOS settings to make sure that the option for booting from a USB is enabled.

The nice thing about Sugar on a Stick is that the mouse isn't so crazy, it doesn't jump around all the place as in the Live-CD. Also with Sugar on a Stick your work is saved to your USB. But there is a problem with the Arabic language setting, I tried it and some of the words were still in English and some were in Arabic, aslo they used the writing technique where the letters are disconnected, for example ن ظ ا م ا ل ت ش غ ي ل which I find annoying, I only tried the Suadi Arabia choice maybe the others are different I don't know.

Saturday 8 August 2009

Creating a Bootable XO-Live CD


Getting Started


Before we get started you will need to have the following:
  1. The XO-Live CD iso image, this can be found here or here. Make sure what you download has the name "XO-Live" and the .iso extension. Or you can download as a torrent from here.
  2. A program to burn the iso image like Nero. You can also find free software that will do this task like IsoRecorder, you will notice there are different versions you can download depending on what version of windows you have, make sure you download the right one, on the website they show you how you can make sure in case your having trouble figuring it out.
  3. An empty CD of course.

Burning the iso image with Nero


The following procedure is done with Nero 6, other versions will be similar, the main commands is what you will need to pay attention to.

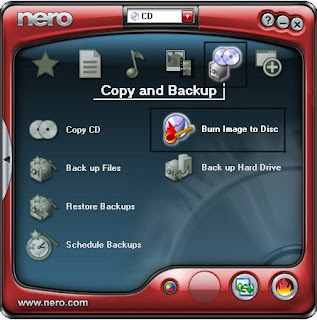
1. First place an empty CD in your disc tray. Then open Nero Start Smart, choose
Copy and Backup --> Burn Image to Disc.


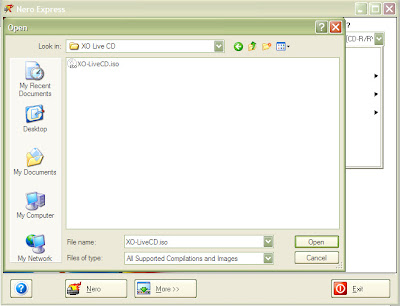
2. Then a browse window will pop up automatically, go to the location you have the iso
image in, choose it, then click
Open.


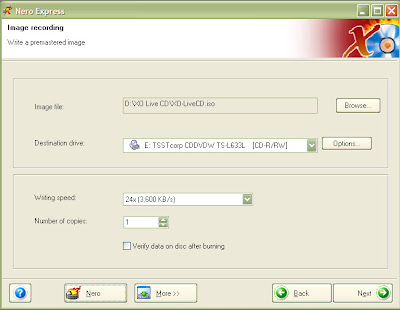
3. Then you'll get the window below, simply press
Next.


4. Now the burning process should begin.


5. After a few minutes you'll get a message notifying you that the process is done. Press
Ok -> Next -> Exit.

That's all! Now you have a bootable XO-Live CD ready to be used :D. Just restart your computer with the CD in the tray & it will automatically boot you into the Sugar OS. The CD comes with plenty activities for you do dive into, so Have fun!!


Burning the iso image with IsoRecorder

If you have IsoRecorder installed you will notice that it has no start up item in the programs list, no icon on your desktop, nothing. Well the reason is you don't have to start up the program to use it, you use it through the right click mouse button. I'll show you what I mean.

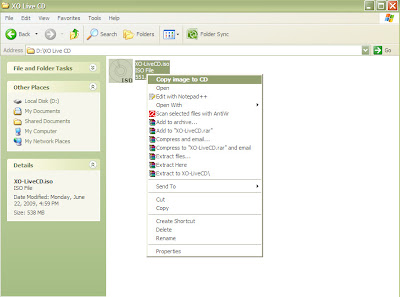
1. Navigate to the location of the iso image you have stored on your computer. Right click on the file, choose Copy Image to CD.


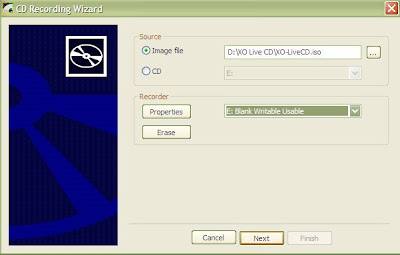
2. A window will pop up - of course you have to have an empty CD in your tray at this point, if your CD is not empty & it's erasable the program can erase it for you then you can continue - Simply click Next.


3. The burning process will take place, it only needs a few minutes & then your done :D.

Now your ready to have fun with all the activities on the XO-Live CD!! Just restart & it will automatically boot into the Sugar environment :D. I might just go play with mine now ;).

Friday 19 June 2009

Installing Sugar on your non-XO Laptop

There's a couple of ways you can do that, either using Virtual Machines and install the OS on it, or you can just use your already existed Linux distribution and install Sugar on it, so if you are already using any Linux distribution I would recommend that.

I've successfully installed Sugar on Ubuntu 8.10 Intrepid after some troubleshooting. So here's what you need to do in order to get Sugar running on your system.

First, if you don't have Ubuntu 8.10 installed yet, please do install it. Then you need to enable the download manager in ubuntu to install from the main server, as in the following snapshots:

(a)
System --> Administration --> Software Sources.


(b)
Check the Universe repository to enable it, if it is not already enabled.

(c) Set "Download from:" to "Main server".


You may have to enter your password to access it:


Now, Open a Terminal and type the following commands (This will need an internet connection and it might take a while, up to two hours for slow connections):
$ sudo dpkg --configure -a
$ sudo apt-get -f install
$ sudo apt-get --fix-missing install
$ sudo apt-get clean
$ sudo apt-get update
$ sudo apt-get upgrade

Reboot your computer and then type:
$ sudo apt-get dist-upgrade
Reboot again.

After you finish all of the above, you can install Sugar (If you tried installing Sugar before updating and upgrading then you might run into few troubles).

Alternatively you can use the update manager: System --> Administrator --> Update Manager, then click on "Check". Then you will either be prompted to upgrade, or do a partial upgrade, either way continue (Upgrade). If it says your system is up to date then your ready to install Sugar :-). You will also need to enter your password at this point.

Open Synaptic Package Manager, Search for Sugar, then Mark Sugar Package for Install, when you mark it, it will ask you if you want to mark all the things needed, Press Yes, Mark All. Also, mark "sugar-activities". Follow the pictures.


Open the Search menu by clicking the Search button at the top of the Synaptics window.


Then type Sugar in the "Search" field - Make sure that the "Look in" field is "Description and Name".


Then mark Sugar for installation - Note that you may have to scroll down to find it, it doesn't necessarily show at the beginning of the result list even though it should -.


Then Click Apply. (Remember this also needs internet Connection).

When it's all done, reboot your computer. And before you login choose a different session as in the pictures:


Then Choose "Sugar" as your session:


Then Login normally. Vowala! You're all set. Play arround! Some snapshots:


If Activities didn't show on the above figure, then you might want to change the view to the List View, and you can add an activity to the Favirote View you need to star it. You won't have all the activities above, but no sweat you can always install them when your in the mood ;-).

Note that after your done having fun with Sugar, most likely the next time you try to login into Ubuntu you'll be logged into Sugar, this is do to the fact that your "Session" option will be "Last Session" which is Sugar, so don't be fooled by the Ubuntu screen, make sure you click on "Session" & the chosen option is "GNOME" to boot into Ubuntu.


Reference: http://en.flossmanuals.net/Sugar/Installing (Some of the pictures are taken from there too)

Local-Suggestion: I suggest we hold a Sugar Installation Festival in Birzeit University, so the PaleXO members can get it in their Laptops, and anyone else in the University or from schools want to do it on their laptops. What do you think?

Saturday 4 April 2009

Writing In Arabic in Sugar

To get Arabic Language working on OLPC Sugar OS, follow the following steps:
(For more information please refer to this link).

First of all you have to be a root to use 'yum' package manager, so follow these commands:

$ su
# yum update
# yum install fonts-arabic
....
# yum install scim scim-gtk
...
# yum install scim-m17n scim-tables
...
# yum install m17n-db-arabic.noarch

After doing this, you need now to activate scim at the start of Sugar (the interface of XO laptop), to do so you need to copy this file ~olpc/.xsession-example to ~olpc/.xsession and then configuring it to add some line of code as follow:

# cp ~olpc/.xsession-example ~olpc/.xsession
# vi ~olpc/.xsession

Then add the following lines to the file:

export XMODIFIERS=@im=SCIM
export GTK_IM_MODULE=scim
export USE_XOPENIM=t
scim -d

Now you need to reboot you XO laptop, just type:
# reboot
After booting, Open Browse Activity put the cursor on the text field then hit the HOT KEY for SCIM which is (CTRL+SPACE) a little pop-up window on the right bottom of the screen will show, just change the language to Arabic and start typing, Wohoo, it's writing Arabic characters.

There's one main Problem I am still facing typing in Arabic:
  1. There's some letters don't come in the correct format, for example if you typed "m" Arabic letter followed by "n" Arabic Letter, it won't attach them to each other, instead they will be like separated letters! (See Picture)


This is a good start in Arabizing OLPC. However it still needs a lot of work.

If you have problems in writing Arabic in OLPC, please send us a note we will try our best to help you.

Sunday 29 March 2009

Arabizing Sugar Interface

To Change your Sugar Interface Language to Arabic you can follow these steps,

7.60-8.20
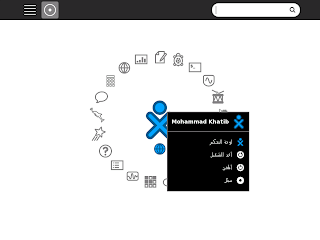
If you are running Build 7.60 (8.20), then it's your lucky day, you can simply roll over your oX in the center of the circle, and Choose Control Panel (As in the Picture). Then go to Languages and choose Arabic. That's All! You need to restart your XO to apply these settings.


After Rebooting you will notice that it is translated in Arabic as in the Following Image:
Older Versions than 7.60-8.20
If you have older version (Normal Case) then you won't find the Control Panel under the main list of your XO. But, you still can use some commands to do the job. So, Open a Terminal Activity, and type:

# sugar-control-panel -s language Arabic/Lebanon
# reboot

This will change your interface language and will restart your XO.

P.S.
To see a list of available languages, type:

# sugar-control-panel -h language

Tuesday 17 March 2009

We Need You!

Great news, Registration is Now open, you can register by filling the Application Form on PaleXO website. Please Feel Free to Contact Us for more Information, we would be more than happy to hear from you.

We Really need you with us in the community, We will be posting ads all over the places. I've Uploaded also the ads on PaleXO website.
Please Visit Our Website for more information: http://palexo.com